 As the name suggests, floor sanding is the procedure of removing only the top surfaces of a hardwood floor with abrasive substances. The most common substance used for floor sanding is fine-grain sandpaper. This paper is often referred to as medium sandpaper because it does not produce the grit effect of other types of sandpaper. These refined grains make the floor more absorbent and easier to clean. But are there any good tips on floor sanding?
The first tip for floor sanding Adelaide concerns the surface to be sanded. Before beginning, it is essential to get a good idea of the area to be sanded. It is best to use plain paper or another flat surface to plot out the best possible layout for the floor. This first cut should be made in a shallow depth of about 0.75 cm.
It is essential to wear no protective gear when making the first cut. Although the floor may appear perfectly smooth, it is still possible to get bits of dust in the first cut. The best thing to do is re-sand the same area using a different abrasive material when this happens. There are dustless hardwood floor sanding products available that will collect the dust without harming the floor. However, using a regular household vacuum is also a good option.
For the best results, it is recommended to apply the sandpaper in two different passes, which helps remove the most amount of dust from the floor simultaneously. When the two sandpaper passes are compared, the difference in the number of dust particles removed per pass is about fifty percent.
Another helpful tip for sanding old floors is to sand both sides of the floor simultaneously. Although it may seem like you are removing more material than necessary, this is the best way to ensure a uniform finish. A flat finish is better than an uneven one since it prevents the floors from slipping and creates a smooth and level surface.
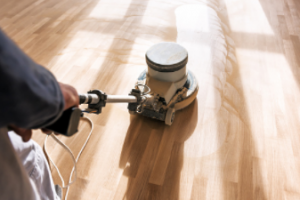
In starting the actual sanding process, a standard sanding process is followed. First, the floor is thoroughly wetted with a solution of water and sand. Next, a drum sander is used to accomplish the sanding process. As the floor is wet, it is best to use a standard sanding pad to prevent the floor from getting too wet. After it is sanded, it is left to dry for an additional twenty-four hours.
Before finishing the floor, a polyurethane finish is applied. Although many homeowners prefer the non-slip and slip-resistant qualities, it can be challenging to apply on a wood floor. For this reason, some homeowners choose to use an epoxy floor coating. This coating is made up of a thick, transparent coating on the wood. The bottom coating is a semi-translucent, coloured layer that will protect against water and dust.
Floor sanding machines are used during the sanding process. Although not required, these machines significantly speed up the process and help ensure accuracy. Before purchasing a machine, however, it is essential to consider how much sandpaper the floor will require. For example, if the room is relatively light, it may not be necessary to purchase a machine with a large drum. Before making a purchase, it is essential to measure the area first to determine how much sandpaper is needed.
There are many different styles of sanders and drum sanders that are available for floor sanding. For example, some sanders come in both vertical and horizontal versions. Most homeowners choose the vertical option because it is easier to use. Another benefit of the vertical model is that it provides consistent, even sanding. If homeowners are concerned about having lines and circles created when sanding a solid surface, they should opt for a drum sander.